
A good Playwright tutorial should not make your first lesson feel like a framework-design course.
If Playwright is already installed, you need only one useful loop at the beginning:
open a page → find an element → interact with it → verify the result → run the test → inspect what happened
That is exactly what you will do here.
This beginner tutorial uses TypeScript + Playwright Test and Playwright’s own TodoMVC demo application. You will create one small browser test, understand every important line, run it in Chromium, deliberately make it fail once, and learn how to read that failure before changing code.
If Playwright is not installed yet, complete the Playwright setup guide first.
If you are still deciding what Playwright is good for, start with the complete Playwright automation guide.
What You Will Build
By the end of this tutorial, you will have a test that:
- opens Playwright’s TodoMVC demo;
- finds the “What needs to be done?” textbox;
- enters a new todo;
- submits it;
- verifies that the todo appears.
That teaches the core beginner flow:
Navigate
→ Locate
→ Interact
→ Assert
→ Run
→ Inspect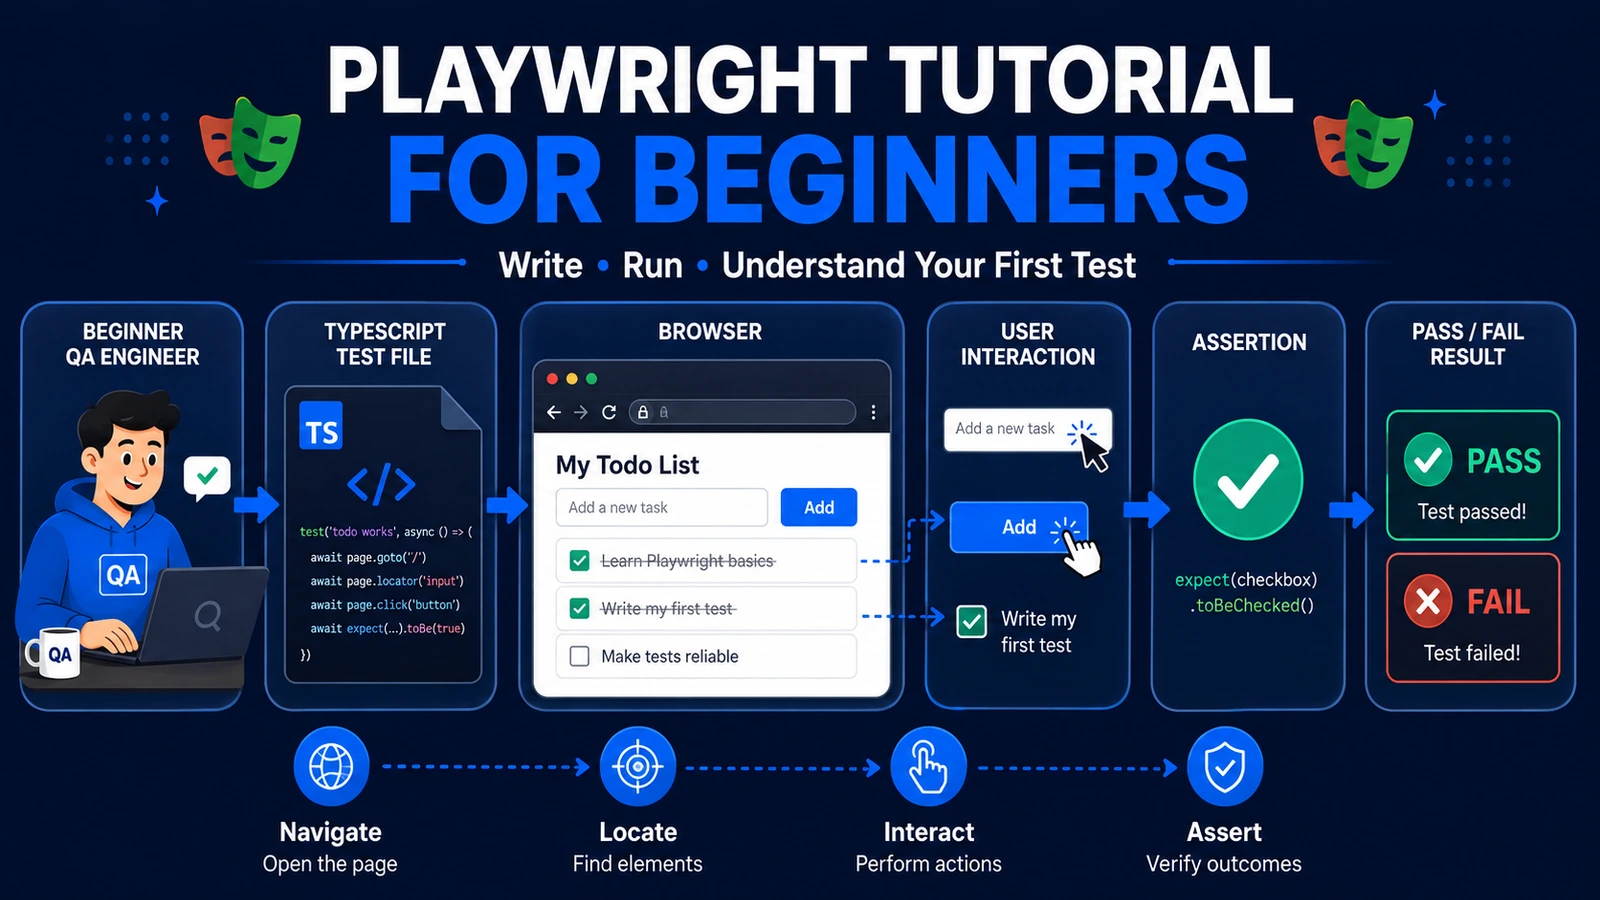
You are not going to build a Page Object Model, configure CI/CD, add API tests, create custom fixtures, or learn every locator today.
Those topics make more sense after the first test actually means something to you.
Before You Start
This article assumes:
- Playwright Test is already installed;
- the browser binaries are available;
- you have a Playwright project;
- you have an editor such as VS Code, Cursor, WebStorm, or another IDE.
A typical Node/TypeScript project created through the official Playwright setup includes a tests/ directory.
We will create:
tests/first-test.spec.tsIf your environment cannot run even the generated Playwright example, stop here and use the Install Playwright guide.
Do not debug test code while the environment itself is still broken.
What Is a Playwright Test?
A Playwright test is a named test function that receives browser fixtures such as page, performs user-like actions in the browser, and uses assertions such as expect() to verify that the application reached the expected state.
In beginner terms:
test()
=
the scenario you want to check

page
=
the browser page you interact with

locator
=
how you identify an element

action
=
what the user does

expect()
=
what must be true for the test to pass
The assertion is what turns browser automation into an actual test.
A script that clicks successfully but never verifies useful behavior may automate something without proving that the feature works.
Understanding the Structure of a Playwright Test
Before writing the complete example, look at the anatomy.
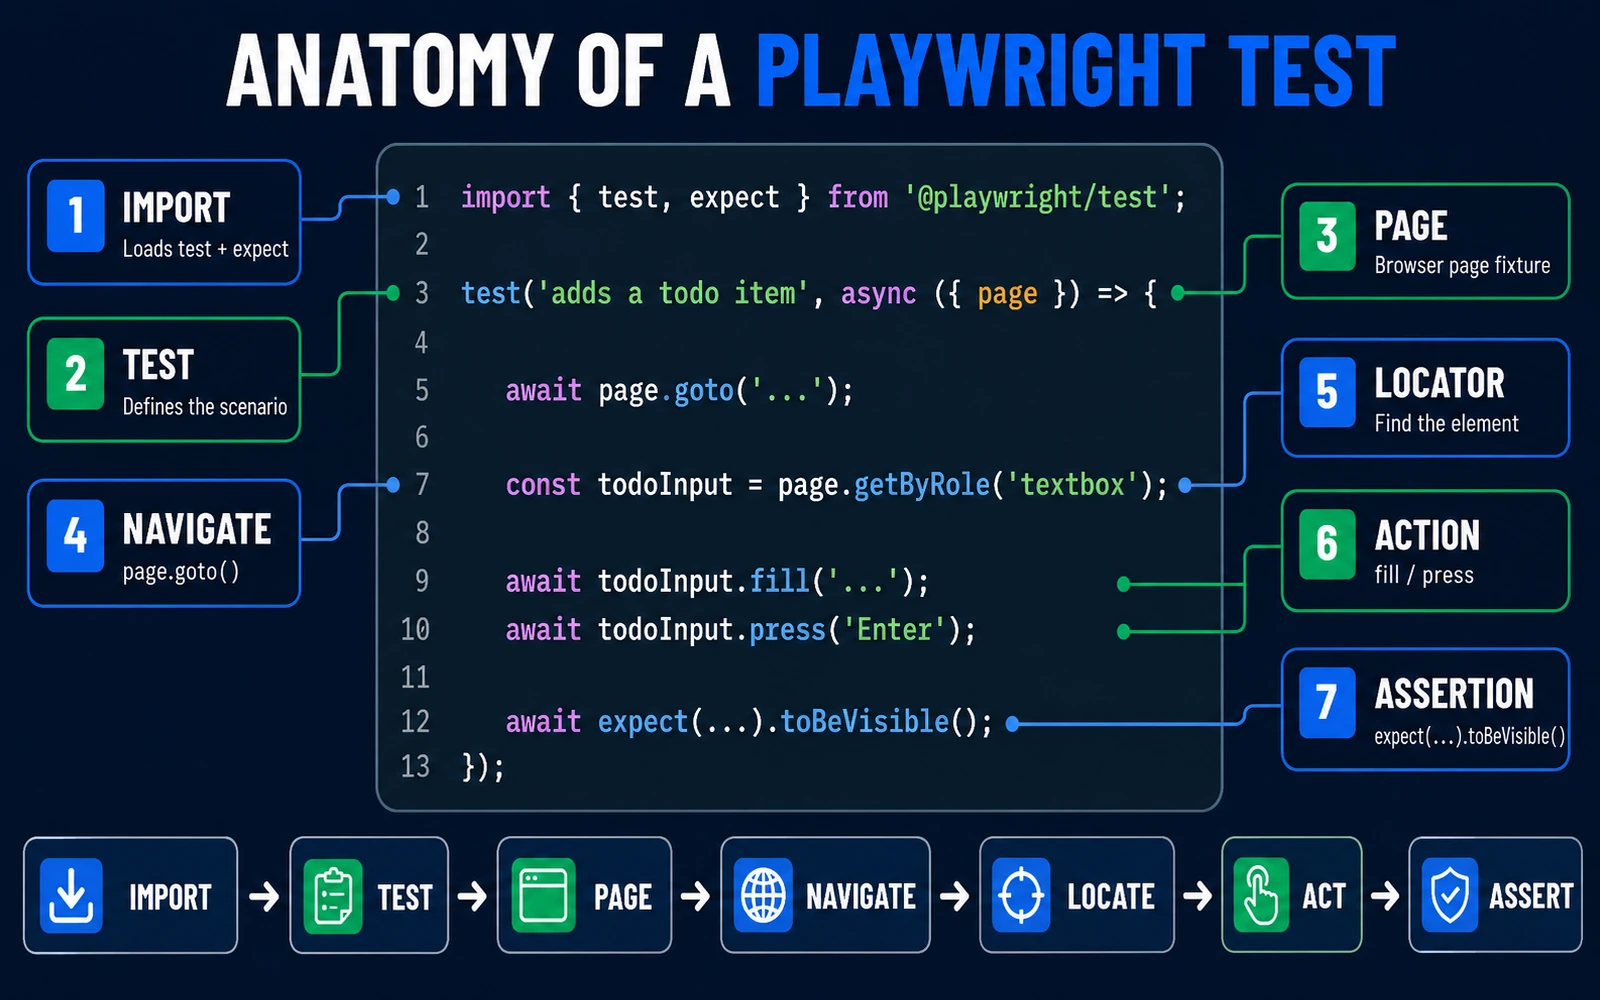
| Part | Purpose |
|---|---|
import { test, expect } |
Loads Playwright Test APIs |
test(...) |
Defines one named scenario |
page |
Gives the test a browser page |
page.goto(...) |
Opens the target page |
| locator | Identifies the element |
| action | Interacts with the element |
expect(...) |
Verifies expected behavior |
A useful mental model is:
import
  ↓
test()
  ↓
page
  ↓
page.goto()
  ↓
locator
  ↓
action
  ↓
expect()
You do not need to understand the full Playwright framework before this flow becomes useful.
Write Your First Playwright Test
We will use:
https://demo.playwright.dev/todomvc/This is a good beginner target because it is hosted under Playwright’s own demo domain, requires no login, and supports a simple state-changing workflow.
Create:
tests/first-test.spec.ts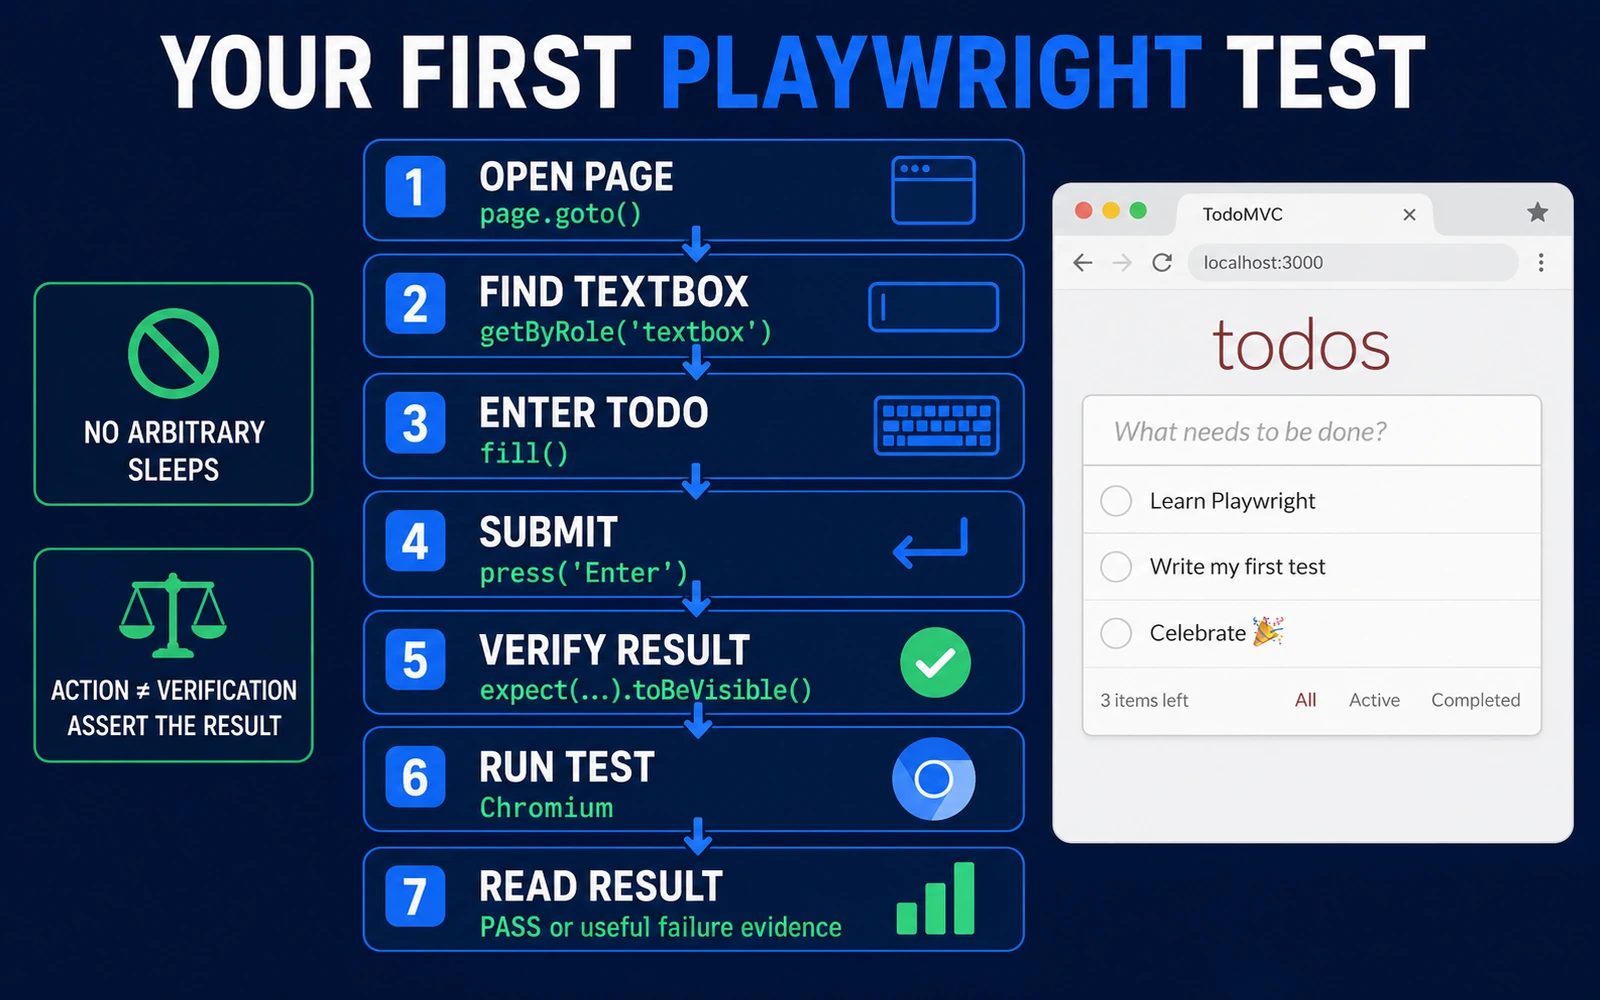
Paste this test:
import { test, expect } from '@playwright/test';

test('adds a todo item', async ({ page }) => {
  await page.goto('https://demo.playwright.dev/todomvc/');

  const todoInput = page.getByRole('textbox', {
    name: 'What needs to be done?',
  });

  await todoInput.fill('Review my first Playwright test');
  await todoInput.press('Enter');

  await expect(
    page.getByText('Review my first Playwright test', { exact: true })
  ).toBeVisible();
});
The test describes one useful behavior:
When a user enters a todo and submits it, the new todo becomes visible.
That is simple enough for a first lesson but meaningful enough to show real testing.
Understand the Test Line by Line
1. Import test and expect
import { test, expect } from '@playwright/test';test defines the scenario.
expect provides assertions that verify behavior.
2. Define the scenario
test('adds a todo item', async ({ page }) => {The text:
adds a todo itemis the test name.
The page fixture gives this test a browser page that Playwright can control.
You will also notice async and await.
Browser automation involves operations that take time—navigation, locating, interaction, and verification—so the test waits for those asynchronous operations to complete.
You do not need a deep JavaScript async lesson yet. The beginner rule is:
If the Playwright action or retrying assertion returns a promise, make sure the tutorial/example shows the required
await.
3. Open the page
await page.goto('https://demo.playwright.dev/todomvc/');page.goto() navigates the browser to the target URL.
This is your starting state.
Do not immediately add fixed sleeps after navigation.
Instead, allow the next meaningful locator/action/assertion to represent the state your test actually needs.
4. Find the textbox
const todoInput = page.getByRole('textbox', {
  name: 'What needs to be done?',
});
This creates a locator.
A locator tells Playwright how to find the element when the test needs to interact with it.
Here we use:
getByRole('textbox', {
  name: 'What needs to be done?',
})
That expresses the element through a user-facing accessibility role and accessible name.
For beginners, that is usually easier to understand than a long CSS path such as:
body > div:nth-child(2) > section > header > inputor a brittle XPath tied tightly to page structure.
Playwright supports more locator types. You only need enough locator knowledge here to make this test readable and stable.
A dedicated Playwright Locators article should own the deeper locator strategy.
Fill and Submit the Todo
We interact with the textbox in two steps.
Fill the textbox
await todoInput.fill('Review my first Playwright test');fill() sets the textbox value.
Press Enter
await todoInput.press('Enter');This submits the new todo through a user-like keyboard interaction.
Your first lesson does not need every Playwright action.
If you understand navigation, fill(), press() and one good assertion, you already have enough to begin reasoning about browser tests.
Verify the Result With an Assertion
Now comes the most important line:
await expect(
  page.getByText('Review my first Playwright test', { exact: true })
).toBeVisible();
This line asks:
Is the todo that we submitted now visible to the user?
That is the expected behavior.
From a QA Engineer’s Perspective
A green automation script is only useful when its assertion proves behavior that matters.
Ask:
What defect would this assertion catch?
In this example, if the user submits a todo but the application fails to display it, the test should fail.
If your assertion cannot identify meaningful incorrect behavior, the script may be exercising the product without actually testing it.
Why We Did Not Add a Sleep
You may see beginner automation examples like this:
await todoInput.press('Enter');
await page.waitForTimeout(5000);
Avoid using that as your default strategy.
A fixed five-second pause does not describe the state the application should reach.
Playwright locator actions perform actionability checks, and web assertions such as toBeVisible() can retry until the expected state is reached or the assertion times out.
That is usually more meaningful than guessing how many milliseconds the application needs.
This does not mean Playwright magically eliminates every synchronization or flaky-test problem.
Real systems can still suffer from:
- unstable environments;
- changing data;
- third-party delays;
- race conditions;
- ambiguous locators;
- incorrect assertions.
The goal is to express the state you need instead of hiding uncertainty behind arbitrary time.
Official reference: https://playwright.dev/docs/actionability
Run Your First Playwright Test
Run only this test file first.
npx playwright test tests/first-test.spec.ts --project=chromiumStarting with one browser keeps the first debugging loop easy to understand.
A successful terminal result will look approximately like:
Running 1 test using 1 worker

  ✓ [chromium] › tests/first-test.spec.ts › adds a todo item

  1 passed
Exact timing and terminal formatting can differ by environment.
The important result is:
1 passedIf it passes, you have now:
- created a Playwright test;
- launched a browser;
- navigated;
- found an element;
- interacted with it;
- asserted expected behavior.
That is a real first milestone.
Run the Test in a Visible Browser
To watch the browser:
npx playwright test tests/first-test.spec.ts --project=chromium --headedThis is useful for beginners because you can connect the code with the behavior you see.
Do not confuse watching the test with debugging the test.
For step-by-step investigation, use debug tooling.
Debug Your First Test
If the test fails, resist the urge to change multiple things immediately.
Run:
npx playwright test tests/first-test.spec.ts --project=chromium --debugDebug mode can open the browser together with Playwright Inspector so you can step through the test.
You can also try UI Mode:
npx playwright test --uiUI Mode gives an interactive view for exploring and running tests.
For this beginner article, that is enough.
Trace Viewer, advanced debugging, reports, retries, fixtures, and framework diagnostics deserve their own deeper lessons.
Deliberately Make the Test Fail Once
A beginner learns more from one controlled failure than from ten copied tests.
After your test passes, temporarily change only the assertion:
await expect(
  page.getByText('This text should not exist', { exact: true })
).toBeVisible();
Run the test again:
npx playwright test tests/first-test.spec.ts --project=chromiumIt should fail.
Now inspect:
- which source line failed;
- which assertion failed;
- what text Playwright expected;
- what Playwright found or did not find;
- the call/error information around the failure.
Then restore the correct assertion.
The lesson is not simply:
“How do I make the test green?”
The lesson is:
“How do I understand why the test is red?”
What to Check When Your First Test Fails
Use this order.
| Failure area | Beginner question |
|---|---|
| Setup | Can Playwright and Chromium launch? |
| Navigation | Did the page open? |
| Locator | Did the locator identify the intended element? |
| Action | Could Playwright interact with it? |
| Assertion | Did the expected state actually happen? |
1. Read the first meaningful failure
Do not start by increasing every timeout.
Look at the failing source line.
2. Identify the category
Was it:
- navigation;
- locator;
- action;
- assertion;
- environment?
3. Rerun only the failing test
npx playwright test tests/first-test.spec.ts --project=chromium --debug4. Make one change
Do not simultaneously:
- change locator;
- add sleep;
- increase timeout;
- remove assertion.
If you change four things at once, you may make the test pass without learning which problem you solved.
From a QA Engineer’s Perspective
A failing test is evidence.
Treat the error message, call log, page state, and failed assertion as diagnostic information before editing the test.
Common Playwright Beginner Mistakes
| Mistake | Why it hurts | Better beginner habit |
|---|---|---|
Forgetting await |
Async steps may not execute as intended | Follow current Playwright async examples |
| Starting before setup works | Test-code debugging becomes environment debugging | Complete PW-02 first |
| Long CSS/XPath chains | Strong coupling to DOM structure | Start with user-facing locators |
| Arbitrary sleeps | Slow and timing-dependent | Wait on meaningful actions/assertions |
| No useful assertion | Script runs without proving behavior | Assert the requirement |
| Hard-coded credentials | Security risk | Use credential-free tutorial data |
| Changing many things after failure | Hides root cause | Make one minimal correction |
| Mixing TS/Python/Java examples | Increases cognitive load | Learn one path first |
| Building Page Objects immediately | Architecture hides basics | Keep first test direct |
| Running every browser first | Too much output during initial debugging | Start with Chromium |
⚡ AI Shortcut: Use AI to Understand Your First Playwright Test
AI can be very useful while learning Playwright—but only when it helps you understand the code rather than replacing understanding.
Use ChatGPT or Claude when you want a clean explanation.
If you are using Cursor or Windsurf inside the repository, tell the agent to explain before editing files.
📋 Copy this ChatGPT / Claude prompt
I am learning Playwright.

I have the following Playwright Test:

[PASTE TEST]

Do not rewrite the test immediately.

First explain it as a QA mentor.

For each important line, tell me:

1. What this line does.
2. Why the test needs it.
3. Whether it is navigation, locator, action, or assertion logic.
4. Which Playwright locator strategy is being used.
5. What user behaviour the assertion is proving.
6. What could make this line fragile or unreliable.
7. Whether the test contains an arbitrary sleep, weak locator,
   missing await, weak assertion, or hard-coded secret.
8. One safe improvement only if the current code genuinely needs it.

Then give me:

A. The test flow in plain English:
   Navigate → Locate → Interact → Assert

B. The business behaviour this test actually verifies.

C. One example of a defect that should make this test fail.

D. One thing I should learn next from this test.

Important rules:

- Do not introduce Page Objects, custom fixtures, CI/CD, API testing,
  framework architecture, or advanced abstractions unless I ask.
- Do not remove or weaken an assertion just to make the test pass.
- Do not recommend arbitrary waitForTimeout() sleeps as the default fix.
- Use current Playwright best practices.
- If you are uncertain about a Playwright API, tell me to verify it
  in the official Playwright documentation.
Do Not Paste These Into Public AI Tools
Before using the prompt, remove:
- passwords;
- tokens;
- cookies;
- production credentials;
- private URLs;
- confidential test data;
- internal customer information.
Human Review Checklist
After AI explains your test, verify:
- Does its explanation match what the code actually does?
- Did it correctly identify the assertion?
- Did it invent application behavior?
- Did it recommend weakening the expected result?
- Did it add complexity a beginner does not need?
- Did it suggest an arbitrary sleep instead of understanding state?
- Did it ask for or expose secrets?
AI produces the first explanation.
The QA engineer owns correctness.
Do I Need JavaScript to Learn Playwright?
Not universally.
Playwright has official ecosystems for JavaScript/TypeScript, Python, Java, and .NET.
This tutorial uses TypeScript because it gives us a direct Playwright Test learning path and lets us teach one consistent syntax.
If you are already committed to Python or Java, you do not need to learn every language first.
Learn the Playwright testing concepts in one ecosystem, then deepen the language-specific path that matches your team.
Should Beginners Learn Every Locator First?
No.
For your first test, understand the concept:
A locator describes the element Playwright should interact with.
Start with readable user-facing locators such as role, label, or text when they match the page contract.
Then learn the locator API properly in the dedicated Playwright Locators guide later.
Do not postpone your first useful test until you have memorised every selector option.
What Should You Learn Next?
You have now completed the beginner loop:
write → run → inspect → understand
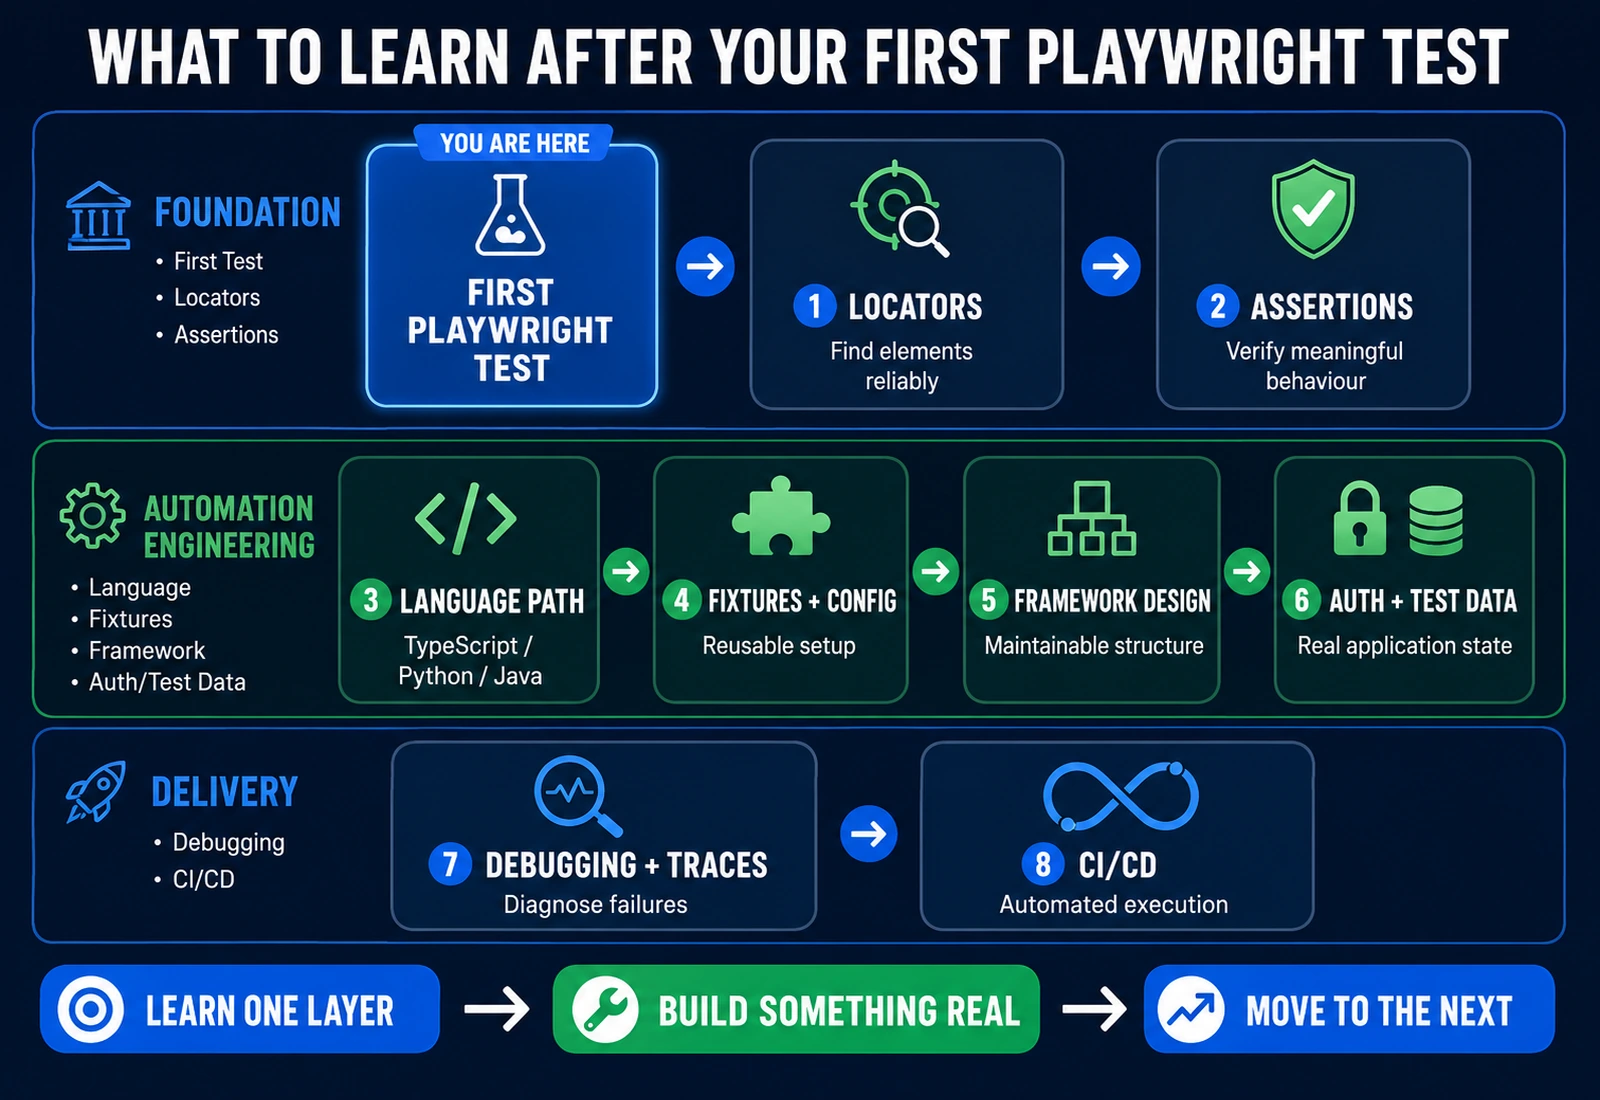
A sensible next sequence is:
- Locators — learn how Playwright identifies elements reliably.
- Assertions — learn to verify more than simple visibility.
- Your language path — deepen TypeScript, Python, or Java.
- Fixtures and configuration — manage reusable setup.
- Framework design — structure larger suites.
- Authentication and test data — handle real application state.
- Debugging and traces — diagnose failures efficiently.
- CI/CD — run tests as part of delivery.
Do not try to master all eight today.
Your next goal should be to write a few small tests without losing sight of:
What behavior am I verifying?That question matters more than how many Playwright APIs you memorise.
For the broader sequence of QA skills, use the QA roadmap if the page is live and verified.
Playwright Tutorial FAQ
Is Playwright easy for beginners?
Playwright has a compact test API and useful built-in tooling, but beginners still need basic coding, web concepts, assertions, and test-design judgment. Start with one useful test instead of trying to learn the entire framework at once.
How do I start learning Playwright?
Install and verify Playwright first. Then create one small test that navigates, locates an element, interacts with it, and asserts an expected result.
Which language should I learn Playwright with?
Choose based on your team and current skills. Playwright supports JavaScript/TypeScript, Python, Java, and .NET. This tutorial uses TypeScript for one consistent beginner path.
What is a Playwright test?
A Playwright test is a named scenario that uses browser fixtures such as page, performs browser actions, and uses assertions such as expect() to verify expected application behavior.
How do I write my first Playwright test?
Create a .spec.ts file, import test and expect, define a test using the page fixture, navigate with page.goto(), locate an element, interact with it, and add a meaningful web assertion.
Do I need JavaScript for Playwright?
No. Playwright supports other languages including Python, Java, and .NET. However, this tutorial uses TypeScript, so basic JavaScript/TypeScript and async/await familiarity will help.
Can I learn Playwright with Python?
Yes. Playwright officially supports Python. The dedicated Testheon Python article should own the full Python-specific learning path.
Can I use Playwright with Java?
Yes. Java is an officially supported Playwright binding. Java-specific setup and testing patterns belong in the dedicated Java guide.
What locator should a beginner use?
Prefer a locator that represents how the user understands the page, such as a role or label where appropriate. Do not memorise the entire locator API before writing your first test.
How do I run a Playwright test?
For this tutorial:
npx playwright test tests/first-test.spec.ts --project=chromiumWhy is my Playwright test failing?
First identify whether the failure is setup, navigation, locator, action, or assertion related. Read the failing source line and Playwright error information, then rerun only that test in debug mode before changing multiple things.
What should I learn after my first Playwright test?
Learn locators and assertions properly, then deepen your chosen language, fixtures/configuration, framework design, debugging, authentication/test data, and CI/CD.
Final Takeaway
Your first Playwright milestone is not:
“I copied a test that passed.”
It is:
“I understand why the test passed—and I know what should make it fail.”
You now know the basic structure of a Playwright test:
test()
→ page
→ navigate
→ locator
→ action
→ expect()
You also know the beginner debugging loop:
Read the failure
→ identify the failed layer
→ change one thing
→ rerun one test
That is enough foundation to move forward without turning your first lesson into framework overload.
The next step is not learning every command.
It is writing a few more small, meaningful tests and learning how to make their locators and assertions stronger.